S
Slim
Guest
How-to Replace the Cabin Filter
Not many people pay attention to the cabin filter on their car. Or don’t realize it’s even there. But, it plays an important role in the circulation of air in your vehicle. Think your car doesn’t put out much heat in the winter? Or cool air in the summer? A clogged cabin filter might be to blame.
Therefore, it’s something everyone should check and replace as necessary (i.e. Does it look dirty or clogged? Or follow the owner’s manual recommendation). And if you take your car to an oil change shop, many of them will check it for you (often without your permission) and offer to replace it for triple the cost.
Save yourself the money! And do it yourself. It’s not that hard.
Below are the steps for replacing the cabin filter in a Mazda 6. Although, the exact locations of things may be different, it should help people with other late model Mazdas
as well.
What you will need:
-A new cabin filter (about $12-15)
-Two hands
1. Open your glove box on the passenger side and clean out the contents inside.

2. Locate the snap lock on the right outside wall of the glove box. It has a elastic strap or string attached to it.
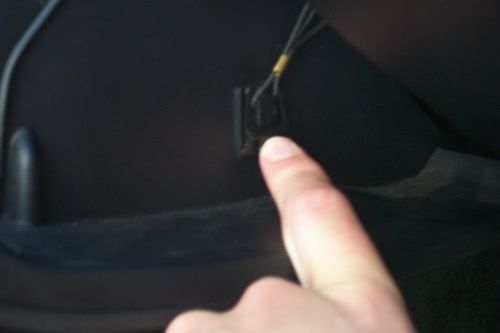
3. Pull the tab on the bottom edge of the snap lock out and push down to release it from the hole in the side of the glove box.

4. On each side of the outside walls of the glove box are small knobs. These knobs are the stops that hold the glove box from opening further. Using both hands, push in gently on the side walls of the glove box until the knobs can clear the surrounding walls.

Then, pull out to open the glove box fully and lower it all the way down. The hinges of the glove box may slide out as well. No worries you can easily slide the hinges back into place.
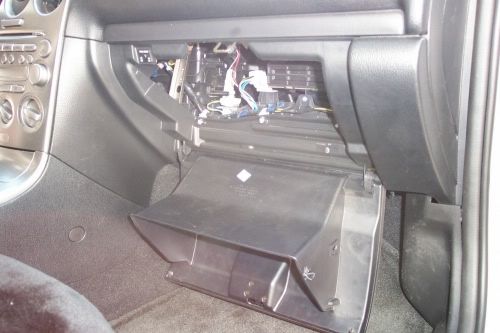
5. Now you can look behind the glove box area and locate the square, black cabin filter housing. On the bottom of the housing are two tabs that hold the faceplate in place.

Pull out on the two tabs to release the faceplate and remove it.

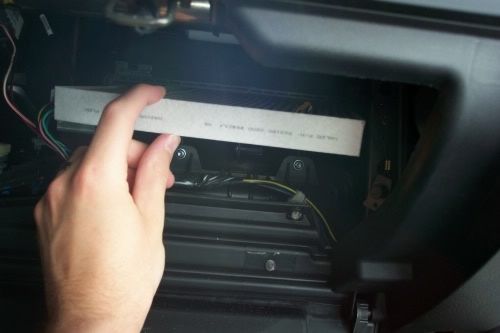
6. Before removing the white cabin filter, take note of the direction the air flow arrow is pointing on the filter itself. You’ll want to remember this for when you put in the new one. (Sorry my picture's a little blurry.)

7. Remove the filter by pulling it out and gently to the left to avoid the metal bar that’s in the way.
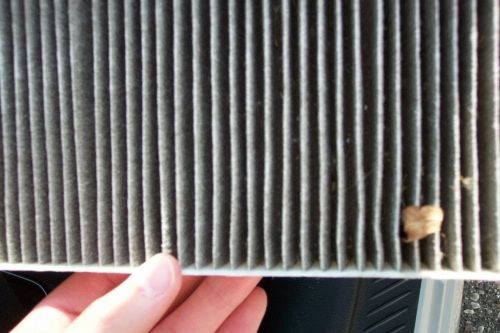
8. Inspect the filter that you just removed. Notice the leaf and discoloration in mine.
9. Grab your new filter and put it back into the filter housing. Be sure to place it according to the arrow direction from before.

10. Replace the faceplate by sliding the top into the slots and then pushing the bottom two tabs to snap it into place.

11. Grab hold of the snap lock/string with one hand, and pull it down and out of the way. Then, with the other hand lift the glove box up until the knobs pop back into place beyond the surrounding walls of the dashboard.

12. Now, for the trickier part. Using one hand, pull on the elastic string to give yourself a little slack. With the other hand, guide the snap lock into the hole in the side of the glove box wall and push up until it snaps into place.

13. You can now refill your glove box.

14. Congratulations! Close your glove box and you’ve now successfully replaced your cabin filter.
DISCLAIMER: Slim has provided this guide as a how-to to use at your own risk. I take no responsibility for any damage incurred to property or persons.
Not many people pay attention to the cabin filter on their car. Or don’t realize it’s even there. But, it plays an important role in the circulation of air in your vehicle. Think your car doesn’t put out much heat in the winter? Or cool air in the summer? A clogged cabin filter might be to blame.
Therefore, it’s something everyone should check and replace as necessary (i.e. Does it look dirty or clogged? Or follow the owner’s manual recommendation). And if you take your car to an oil change shop, many of them will check it for you (often without your permission) and offer to replace it for triple the cost.
Save yourself the money! And do it yourself. It’s not that hard.
Below are the steps for replacing the cabin filter in a Mazda 6. Although, the exact locations of things may be different, it should help people with other late model Mazdas
as well.
What you will need:
-A new cabin filter (about $12-15)
-Two hands
1. Open your glove box on the passenger side and clean out the contents inside.
2. Locate the snap lock on the right outside wall of the glove box. It has a elastic strap or string attached to it.
3. Pull the tab on the bottom edge of the snap lock out and push down to release it from the hole in the side of the glove box.
4. On each side of the outside walls of the glove box are small knobs. These knobs are the stops that hold the glove box from opening further. Using both hands, push in gently on the side walls of the glove box until the knobs can clear the surrounding walls.
Then, pull out to open the glove box fully and lower it all the way down. The hinges of the glove box may slide out as well. No worries you can easily slide the hinges back into place.
5. Now you can look behind the glove box area and locate the square, black cabin filter housing. On the bottom of the housing are two tabs that hold the faceplate in place.
Pull out on the two tabs to release the faceplate and remove it.
6. Before removing the white cabin filter, take note of the direction the air flow arrow is pointing on the filter itself. You’ll want to remember this for when you put in the new one. (Sorry my picture's a little blurry.)
7. Remove the filter by pulling it out and gently to the left to avoid the metal bar that’s in the way.
8. Inspect the filter that you just removed. Notice the leaf and discoloration in mine.
9. Grab your new filter and put it back into the filter housing. Be sure to place it according to the arrow direction from before.
10. Replace the faceplate by sliding the top into the slots and then pushing the bottom two tabs to snap it into place.
11. Grab hold of the snap lock/string with one hand, and pull it down and out of the way. Then, with the other hand lift the glove box up until the knobs pop back into place beyond the surrounding walls of the dashboard.
12. Now, for the trickier part. Using one hand, pull on the elastic string to give yourself a little slack. With the other hand, guide the snap lock into the hole in the side of the glove box wall and push up until it snaps into place.
13. You can now refill your glove box.
14. Congratulations! Close your glove box and you’ve now successfully replaced your cabin filter.
DISCLAIMER: Slim has provided this guide as a how-to to use at your own risk. I take no responsibility for any damage incurred to property or persons.
Last edited by a moderator:
